
Hey guys days passed like anything, it’s been so long, I hardly find time for writing, this is the third vital artifact sharing with you, here comes angular.
We need npm for installing the Angular and node js for installing npm.
Installing node
Go to node js downloads page choose msi(microsoft) installer for windows.

Choose Add to path while installing, otherwise you manually have to add node installation folder to System’s path.
Ensure you find the following in your System’s path
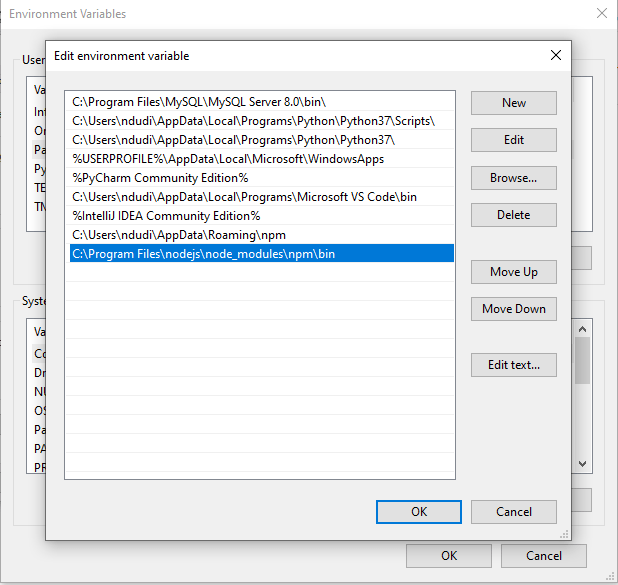
now type node -v to conform proper node installation and set up.
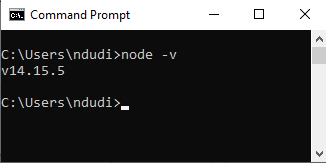
now type npm -v to conform npm- node package manager is installed properly.

Installing Angular
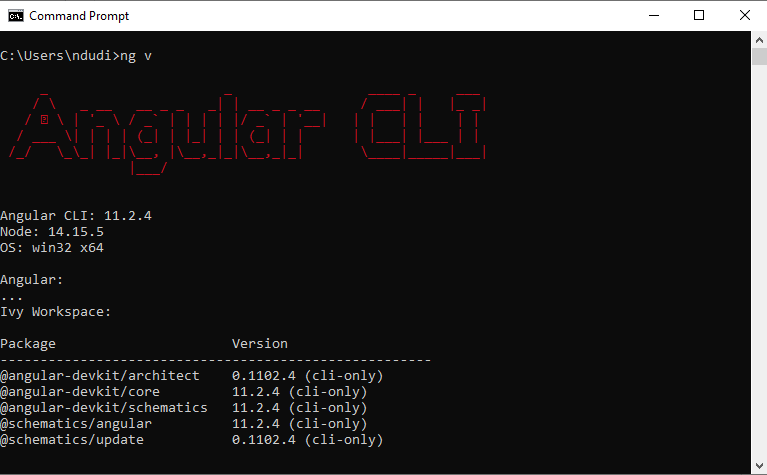
Now to install Angular run command npm install -g @angular/cli@latest. It will take a while, upon successful installation, when you type ng v you will see the following
Now you are done with basic installations, now lets’ start a project and form learn by example strategy
to create a new project let’s create a simple course book, where users can see various courses and register for them.
to create a new project, go to the folder where you want to create the project and in the cmd type
ng new coursebook
do as follows

We can skip routing for now, and choose css as style sheet format, It takes some time for project creation with the node modules setup, It will create a project folder. To conform successful creation, we run the app with ng serve
as follows

the app compiles now we can see the app being started on local host with port 4200, upon successful compilation we see the following

now install vs code (IDE) from vs code installation page.
open cmd(command prompt) and cd(change directory) to the project folder, here Coursebook namely. now, type code . to open the project folder in vs code as follows

now you will see the following files in the project, let’s understand each

- node_modules will hold all the created and built in libraries and dependencies for the project.
- assets folder is accessible across the project, will be used to store project related files like images, text files etc,.
- index.html is our main HTML, we don’t have to care much about it, web-pack will generate it every time we serve the project, we add any explicit urls like java script or CSS to this when needed.
- styles.css is used to add any global styles for the project.
- angular.json holds project schema and details.
- package.json holds all installed packages, dependencies with specific versions.
- Under folder src, app forms our root folder which has 5 subfolders
app.module.ts
app.module.ts forms our root module, app can contain any number of modules, but this form app’s root module, when you open it, you see

any module must have @NgModule decorator over it’s class, which has declarations : holds all component declarations , imports : holds all other imported modules, providers: holds services, bootstrap : the component with which the app should start.
app.component.ts
- app.component.ts forms our root component, which generally gets bootstrapped meaning that it will get started with the app as this generally included in the bootstrap section of app.module.ts, when you first open it, you see
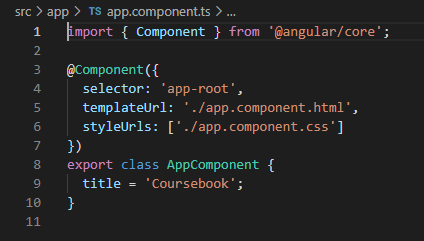
any component must have @Component decorator, the selector is used to identify each component uniquely, templateUrl holds the path for view nothing but HTML, if view is pretty small, we can just use template and write the html code in back ticks(` `), the third one styleUrls contain the path for our style files namely css, there can be multiple style files so we use an array.
by now you could have understood that a component has a model, view with html and css files, and it’s own business logic with controller as ts (type script) file. To use any component in the app, it must be included under declaration section of module that it corresponds to, as we are using only one module, here that corresponds to app.module.ts.
- app.componet.html contains html code for app-component.
- app.component.css contains css code for app-component.
- app.component.spec.ts is used for writing test cases for component.
When you open app.component.html you see all the code that is responsible for the content of the web page when you have checked localhost:4200/. Now remove all that code.
By now you have understood that a component has three/four files associated with it, html, css, ts, spec.ts( is optional), also see that all of those are in a folder with the same name describing what it is (app here), now let’s manually create a component named course. To do so, create folder named course under app, then create
course.component.html
course.componet.css
course.component.ts files manually, now the project file structure looks as follows

now as course is a component, we need to add the following code to course.component.ts.
import { Component} from '@angular/core';

@Component({
  selector: 'app-course',
  templateUrl: './course.component.html',
  styleUrls: ['./course.component.css']
})
export class CourseComponent {
}
just add the following to course.component.html
<h2>course component works</h2>
Now the primary task, add CourseComponent to the declaration section of app.module.ts, now app.module.ts content will be as follows

Now to check whether the component creation is successful, add the following code to app.component.html
<app-course><app-course>
observe here app-course is the selector for the course component, now run the app with ng serve command, now open localhost:4200, you see the following

see, we manually have created files, added a line to check whether component working, added declaration, doesn’t it feel tedious, angular helps us avoid all this overhead by providing us a command to create a component,
ng generate component componentname
ng g c componentname in short
to skip tests, use
ng g c componentname –skipTests
now lets create courses component with this command, ensure you are running the command in the same path as of app, after creation, observe the files courses.component.html, courses.component.ts and app.module.ts, now you might have understood that what we does before is same as what this command does, it just adds a constructor, ngOnInit to ts file in addition.
Now the idea behind courses component is that we will have a list of courses in our CourseBook while each course here is a unique component so courses component holds all courses in the CourseBook.
Communication Between Type Script and HTML
suppose you have some variable in type script file and you want it’s value to be used in html, there is an event triggered from User Interface (HTML ) and the typescript have to do something with that, angular provides us 4 ways to establish communication between HTML and Type Script.
String Interpolation
A variable in type script with certain value can be accessed in HTML using double curly braces. this is simplex communication, used to communicate from ts to HTML.
ex:

in HTML,

output

Property Binding:
you can bind any attribute of a HTML tag to a variable of type script by placing that attribute in square brackets. As String Interpolation, this is also one way communication, from ts to HTML.
ex:

in HTML, we are adding a hyper link, binding url value to href attribute / property of a tag

output

Event Binding:
This is also one way communication, but from HTML to ts, event binding is used to trigger something upon some events like button click, mouse hover etc.
ex:

in HTML

Observe that we use (click) for event binding
Output:


Two way Binding:
This is duplex type of communication where we can both trigger and update upon some action or event
ex:

in HTML

Observe that we have used [(ngModel)] for two way binding, in order to use this we must import Forms module,
app.module.ts

Output:

Inter component communication
Now you might have got some idea on the communication between ts and HTML but how do we establish communication between components, to answer this, angular provides us two different ways , one is the communication between parent and child components and the other is inter component communication, any two components talk to each other this way, so we choose this, the easiest and most efficient,which is nothing but a service. Lets understand about service.
A service file will have the common methods which are invoked and used by components.
To create a service
ng generate service service-name
ng g s service-name in short
now lets create a course service with ng g s course , you will now see two files being created one is course.service.ts and other course.service.spec.ts is for testing, we won’t be using this.
when you open course.service.ts, you see

A service is a dependency injection, we use in components, Every service has a @Injectable decorator, to use the service we either need to include in the providers section of the app.module.ts or we can just add providedIn: ‘root’ in the service itself, we prefer the second way.
Angular Routing
Here is the time for angular routing, As angular builds single page web applications, the page should not reload upon every event or click or page change, also in single page we have to display all the required components which is possible with routing.
We generally use a different routing module for creating routes or angular does this for us during creation of the project itself, It will ask us whether to create the routes, I haven’t selected it so as to explain you with manual creation
lets start by creating a module named, app-routing, to do so
ng generate module app-routing
ng g m app-routing (in short)
We include all our routes in this module, as of now we have course and courses components we include routes the following way
import { NgModule } from '@angular/core';
import { CommonModule } from '@angular/common';
import { RouterModule, Routes } from '@angular/router';
import { CoursesComponent } from '../courses/courses.component';


const routes: Routes = [

  {
    path: '',
    redirectTo: 'courses',
    pathMatch: 'full'

  },
  {
    path: 'courses',
    component: CoursesComponent
  }
]


@NgModule({
  declarations: [],
  imports: [
    CommonModule, RouterModule.forRoot(routes)
  ],
  exports:[RouterModule]
})
export class AppRoutingModule { }
Observe that RouterModule has been imported and all our routes are added to forRoot method, we then add RouterModule in the export section which is to export our routes to app.module.ts, thus our routes addition ends once we import this Module in app.module.ts imports section.
add AppRouting Module in the imports section of app.module.ts.
we now have to include <router-outlet></router-outlet> in the app.component.html all components will be loaded as per the route(path) we are on.
Angular Guards
We also have to discuss few lines about guards, guards are used to provide security for routes, these are of 4 types canActivate and canDeactivate, canLoad, canActivateChild can activate ensures we enter a specific route if only we pass requirements like authentication privileges, can deactivate ensures that we only leave a route if we pass the security check, can load ensures we load a component, can activate child ensures we load a child route only after a successful validation.
To create a guard, we have to run
ng generate guard guard-name
ng g g guard-name
It will ask us to select the type of the guard can Activate or can Deactivate or the other two, as an example I am creating a can Activate guard named Auth which will allow us to only enter our route upon timer hits 5 seconds.

Promise takes an anonymous function as argument, promise can either be resolved after successful validation or can be rejected, auth guard resolves a promise after 5 seconds.
Angular Forms:
angular provides us two types of forms, one is template driven and reactive forms, template driven are simple forms where the enough logic written in the template(HTML) defines the form, while reactive forms are more scalable and the almost all the logic is written in ts file itself.
Template driven Forms:
to use template driven Forms, we have to import Forms module in app.module.ts, we already have included this for two way binding
Now I have created a component named t-form to illustrate template driven forms, also added a route for it, created form like this in the template(HTML)
<form class="mt-8" #courseform="ngForm" (ngSubmit)="courseform.form.valid && onSubmit(courseform)">
    <div class="form-group">
        <label for="coursename">CourseName</label>
        <input type="text"
                class="form-control"
                id="coursename"
                name="coursename"
                required
                minlength="1"
                (change)="log(coursename)"
                ngModel
                #coursename="ngModel"
                >
    </div>
    <div class="alert alert-danger" *ngIf="coursename.touched && coursename.invalid">
        <span *ngIf=" coursename.errors && coursename.errors.required">The coursename field cannot be empty</span>
        <span *ngIf="coursename.errors && coursename.errors.minlength">The coursename field should be of {{ coursename.errors.minlength.requiredLength - coursename.errors.minlength.actualLength }}</span> -->
    </div>
    <div class="form-group">
        <label for="courseprice">Course Price</label>
        <input type="number"
               name="courseprice"
               id="courseprice"
               ngModel
               #courseprice="ngModel"
               >
    </div>
    <div class="form-group">
        <label for="duration">Course Duration</label>
        <input type="number"
                class="form-control"
                id="duration"
                name="duration"
                required
                ngModel
                #duration="ngModel"
                >

    </div>
    <button type="submit" class="btn btn-primary">Submit</button>
</form>
observe that ngForm is used to bind our <form> tag, this binding will be taken care by angular in template driven forms, we just need to add a reference for ngForm, it is #courseform here, we also need to keep ngModel on all of our input tags to make the angular to bind them with Form Controllers. adding a reference on input fields is optional, it is used to check errors, here in this case, I have used #coursename reference to check the errors on it like min length and required.
*ngIf forms a structural directive from angular, which works the same way as If condition in any other programming languages, As the structure of the template may vary upon this directive, it starts with an asterisk ( * ). Also angular provides us various attributes for form controller, I have used .touched which checks whether we have clicked on that form element, .errors will be true if there are any errors.
now this is the ts file
import { Component, OnInit } from '@angular/core';
import { NgForm } from '@angular/forms';

@Component({
  selector: 'app-t-form',
  templateUrl: './t-form.component.html',
  styleUrls: ['./t-form.component.css']
})
export class TFormComponent implements OnInit {

  constructor() { }

  ngOnInit(): void {
  }
  log(course: any){
    console.log(course);
  }

  onSubmit(courseform: NgForm) {
    console.log(courseform.value);
  }

}
If you observe, we have used event binding in above HTML code, i.e (ngSubmit), this will be called once the form is submitted, upon submission you will be able to see the form details in the console.
the output as follows

Reactive/ Model-Driven Forms
To work with reactive forms, we need to import ReactiveFormsModule in app.module.ts Lets create a component named r-form for reactive form and also add a route to it in the app-routing.module.ts, now we create a form in the template like the following
<form
[formGroup]="courseForm"
(ngSubmit)="formSubmission(courseForm)"
class="mt-8 col-md-8">
    <div class="form-group">
        <label for="coursename">CourseName</label>
        <input type="text"
                class="form-control"
                id="coursename"
                formControlName="coursename"
                >
    </div>
    <div class="alret alert-danger" *ngIf=" coursename && coursename.touched && coursename.invalid">
        <span *ngIf=" coursename && coursename.errors && coursename.errors.required">The coursename field cannot be empty</span>
        <span *ngIf="coursename && coursename.errors && coursename.errors.minlength">The coursename field should be of {{ coursename.errors.minlength.requiredLength - coursename.errors.minlength.actualLength }}</span> -->
    </div>
    <div class="form-group">
        <label for="courseprice">Course Price</label>
        <input type="number"
               id="courseprice"
               formControlName="courseprice"
               >
    </div>
    <div *ngIf="courseprice && courseprice.touched" class="alert alert-warning">
        course price can not be empty
    </div>
    <div class="form-group">
        <label for="duration">Course Duration</label>
        <input type="number"
                class="form-control"
                id="duration"
                formControlName="courseduration"
                >

    </div>
    <button type="submit"
            class="btn btn-primary"
            [disabled]="courseForm.invalid">Submit</button>
</form>
Observe that we added formControlNames instead of ngModels in template form, added formGroup property biniding and also added ngSubmit event binding, reactive forms are imperative approach, where form is being controlled mostly by user in the model while template driven forms are declare style of creating forms.
Here is r-form.component.ts
import { Component, OnInit } from '@angular/core';
import { FormControl, FormGroup, NgForm, Validators } from '@angular/forms';

@Component({
  selector: 'app-r-form',
  templateUrl: './r-form.component.html',
  styleUrls: ['./r-form.component.css']
})
export class RFormComponent implements OnInit {

  constructor() { }

  ngOnInit(): void {
  }
  courseForm = new FormGroup({
    coursename: new FormControl('', [
      Validators.required,
      Validators.minLength(6),
      Validators.maxLength(12)
    ]),
    courseprice: new FormControl('', [
      Validators.required
    ]),
    courseduration: new FormControl('', [
      Validators.required
    ])
  })

  get coursename(){
    return this.courseForm.get("coursename");
  }

  get courseprice(){
    return this.courseForm.get("courseprice");
  }

  get coureduration(){
    return this.courseForm.get("courseduration");
  }

  formSubmission(form: FormGroup){
    const{coursename, courseprice, courseduration} = form.value;
    let course: any = {};
    course.name = coursename;
    course.duration = courseduration;
    course.price = courseprice;
    console.log(course);
  }

}
for every form input, I have added an formControl, formGroup reflects our form, all validations are created here itself unlike template driven. I am logging the form value upon submission.

I will be discussing more about navigation, angular pipes and CourseBook project in the next blog.
Thank you reader : )

