Hey Guys,
Here is an another vital artifact from my training, I am going to tell you about the basic and most used commands in the terminal to the advanced system administration, shell script, this blog is as part of my Linux experience, it may not reflect the every command of the terminal.
What resided in your mind, when some one say best OS,.? is it the Response time ..? , User interface ..?, Intuitiveness ..? , Easy to operate ..? , No delay or quicker recovery from crashes ..?, I would love to tell you the history how Linux has started .
UNIX was most famous OS, which is used for automation in various businesses, initially it was free and been commercialized with it’s pride. Linus Torvalds used to work with UNIX development group and he suggested many improvements to the OS, they have just ignored his ideas, once the UNIX became commercial, Torvalds lost interest in it and had a dream to develop a Kernel ( Program that operates or the main controller of the OS, referred to as the heart of the operating system). He started developing the Kernel and developed it after a lot of hard work, this person is behind every latest Machines and technologies that we use.
However with his Hard work and the experience he had with UNIX group, he developed the KERNEL, now the skeleton is ready some one have to come and provide Blood and flesh, here is a savior, GNOME, it is one of the UI providers for UNIX operating system, It is waiting for the alternative to UNIX as it is a open source desktop environment provider, with UNIX commercialization, GNOME team met Torvalds and resulted in the game changing open source OS : LINUX, which is then incorporated and used by various companies in various fields which include Embedded Systems like Microwave Ovens, Dish Washers, Washing Machines, Dish setup boxes, Self driving cars, Robotics, Automated machines. While considering the emerging Computer technologies, Linux provides awesome services, Android and Mac OSes were built on Linux, Linux servers are almost everywhere, these cover 70% of Internet servers along with these, most commercial business servers are Linux systems. With it’s effective resiliency, response time, it is now much more faster than any known operating systems.
Let us all thank Linus Torvalds for his seamless work in developing the OS and his intent to make it available for free with nothing in return.

Now you have understood how Linux is accustomed with our lives hiding somewhere in the background. Now as a developer, you have to know that the fastest and effective way to communicate with any Operating system is through Command Prompt or the terminal, windows is most famous OS right, but the command prompt in windows is less used, here comes the Terminal, One interface for all your queries with the OS.
Let’s look at the Linux file system architecture

/ represents root directory, parent of the entire file system, it has 16 child nodes, namely /bin, /boot, /dev, /etc, /home, /lib, /media, /mnt, /opt, /sbin, /srv, /tmp, /usr, /var, /root, /proc, all of these are directory trees. Let’s have a small brief about each of these directories.
/bin represents user command binaries, all commands that we use in the terminal have their sources here, this directory maintains manual pages of the commands along with their binaries.
/boot represents various boot files which are run upon OS startup(booting). These files are static as they are executed upon system boot.
/dev represents device files.
/etc is the nerve center of the system, it contains various configuration files which are executable static files. It also holds directories for run levels.
/home is the home directory for users, it contains the user specific directories.
/lib contains various shared libraries, kernel and OS specific modules.
/media contains sub directories that can act as mount points, like USB, flash drive, CD-ROM etc., that are removable.
/mnt represents a temporary mount point, An admin can use this temporary mount point upon necessity.
/opt represents optional application packages, some applications make use of this directory to store the application related files.
/sbin represents system binaries.
/srv represents the data or storage for various services provided by OS.
/tmp holds temporary files.
/usr represents user stuff, contain multi-user utilities and applications. It is also the default location of user home directories.
/var represents variable files, contains files to which the system writes data during the course of its operation.
/root represents the root, it is the home directory for the root user.
/proc represents processes, it contains text file representation of virtual filesystem documentation, kernel and process status.
Lets dig deep into commands
At first I want to tell you about how you can get help, when you forget command usage , there are 3 ways you can do that.
1. Manual
usage:
man gives the entire manual of all commands, man followed by command gives the manual of command
ex: man ls gives the manual of ls command and it’s usage
2. Information
usage: info command name
ex: info tail gives the information about the tail command
3. Whatis
usage: whatis command name
ex: whatis date Gives the one line description of command date
In the terminal,
~ signifies user’s home Directory
# signifies Normal user
$ signifies Root user
Linux has various shells, we use sh and bash while ksh, tsh are used for research purposes, and I remember zsh is another shell.
in order to print a string we use
echo “The content we want to print”
accessing variables in shell are prefixed with $. as a example we can create a variable ‘name’ like this
name=”praveen”
Now to access name we use
$name
to print the name, use
echo $name
The following commands are used to know about the OS
uname outputs Kernel name
uname -a results in all details (a for all)
uname -v gives kernel version (v for version)
uname -s results in Kernel (s for system)
uname -o gives Operating System
uname -p outputs processor
Let’s look into list command and it’s usage
ls lists all directories and files
ls -a results in all files, hidden files inclusive
ls -l results in longlisting(file permissions)
Here is a new term file permissions , let’s discuss about it
any file has 4 types of permissions they are referred to read(r), write(w) , execute(x), no permission( _ ).
also there are three different types of users
owner/user referred as u
group referred as g
others referred as o
file permissions are based on the privilege’s that the specific user have on the file, let’s discuss more about these with the flow.
Now Let’s look at ls command:
ls -h lists in human readable format
ls -r reverses the list
ls -i gives inode values
Inode values are used to check whether there are any links to files, let’s discuss about links and their usage while briefing files.
Let’s discuss about directories
we use
pwd to know current working directory
mkdir is used to make a directory which will only contain files
mkdir -p is used to make a directory which can have sub directories along with files
cd <dirname> to change directory
cd .. to move one directory up
cd ../.. to goto two directories up
cd ../../.. to goto three directories up
cd path to go to that path
cd – will take to previously working directory
cd take to home
cd ~ directly go to home similar to using cd alone
cd / go to the root directory
Had a good overview of directory commands right, now let us look at files
touch <filename> will create a file
cat command accept some input from the user and outputs the content to screen
generally cat takes STDIN and throws STDOUT
cat usage:
cat > filename is used to create a file and open it in write mode, this will override the content of file, if file exists already.
cat >> filename opens the file in append mode
cat filename displays the content of file
tac filename displays the content of file with each line from right to left i.e. reverses the content of file.
cat file1 file2 file3 displays the content of file1 followed by content of file2 and then file3 just concatenate the contents of all the files and this is same for any number of files.
Let’s look at more file operations
cp command is used to copy a file to destination path.
cp file1 path will copy the file1 to destination path.
If there is already a file in the destination, copy will not be executed.
use cp -f file1 path for replacing the file at the destination.
cp -r directory path will copy a directory to destination path, here r signifies recursively copy all files in the directory to the destination path .
rm <filename> is used to remove a file.
rm -r <directory> will remove a directory , r signifies recursively repeat the command rm for all files in the directory.
mv file/dirname destination will move the file to the destination
Let’s know about character count in files
wc filename outputs number of lines followed by number of words followed by number of characters.
wc -c filename results in number of characters.
wc -l filename gives the number of lines.
wc -w filename shows the number of words.
To know the limited content of file we use head and tail commands
head filename displays the first 10 lines of file.
head -2 filename displays first 2 lines of file.
tail filename displays the last 10 lines of file.
tail -2 filename displays the last 2 lines of file.
To monitor the content of file we use more or less commands
usage: more filename/ path this will display the content to fit to the screen size,
press spacebar to navigate between pages and q to quit
less command is more versatile,
usage: less filename/path
press
G to reach the end of file
g to go to the beginning of file
spacebar to shift to next page
/ for forward search
? is used for backward search
Lets look at the file permissions in detail
as discussed above Linux supports multi user and the privilege’s for each user differ, so does the permissions.
file permission follows the format of owner/user(u) group(g) others(o)
ex: -rwx rw- r–
i.e. owner or user have read, write and execute permissions, while group only has read and write permission while others just have read permission.
We can change / modify the permissions using the following commands
chmod is used to change file/ directory permissions
usage: to add write permissions to group
chmod g+w file1
to add same permissions for a directory , we use
chmod -r g+w dirname
Now to remove permissions use – instead of + in the above commands
To change the permissions for a owner
chown <permissions> filename
chown -r <permissions> dirname
To change the permissions for a group use
chgrp <permissions> filename
chgrp -r <permissions> dirname
In both of the above cases only root user can modify permissions for owner or group
Did you feel using +, – a bit tedious, no worries, we have an alternative, Linux developers represented the permissions with binary digits,
1 represents there is a permission and 0 is the converse.
as an example permissions 110 110 100 is the default permissions which in decimal can be read as 664 (6 – 110, 6 – 110, 4 – 100). So 664 signifies rw- rw- r– permissions i.e. user/ owner has read and write permissions, group has the same permissions while others only have read permission.
As a generalization, first digit signifies permissions for owner, second for group and third for others.
Let’s discuss about links, what are links actually,.?
they are nothing but backup for a file, these are used to quickly access the files without directly dealing with files, links are of two types soft link and hard link.
Soft link:
soft link has same inode value (used to uniquely identify file) as that of file. Once the file got deleted, all soft links for the file will be deleted.
usage: ln -s softlinkfilename filename
Hard link:
hard link retains the content of file even after the deletion of original file so it’s inode value differ from inode value of file.
usage: ln hardlinkfilename filename
To verify whether the file has hard or soft links, use
ls -l file linkfilename
Got a good content of files right, let’s look at few handy commands
whereis followed by command tells the location of source manual pages of the command, binary executable file.
whoami gives the type of user, who is using currently using like root, group etc.
who gives all users who are currently logged in.
which followed by command is used to locate the command, i.e. to find it’s location in manual pages.
history gives the list of all commands used from the kernel start to the latest command used.
Ctrl + d is used generally to exit from terminal, Ctrl + c / Ctrl + z will work for the same.
sudo before a command signifies running the command with admin privilege’s.
apt signifies advanced package tool, which is a command-line utility for installing, updating, removing, and otherwise managing deb packages for various Linux distributions.
Now let’s discuss about Run Levels,
There are 7 run level, each have their own purpose
0 does shutdown.
1 single user mode (root user) without any network services.
2 multi user mode with few networking services.
3 multi user mode with all networking services.
4 user specific.
5 Multi user mode with all networking services + GUI, it is the
default run level.
6 Reboot / Restart.
usage:
init <run_level_no>
ex:
init 2
we can accesses run level directories under /etc directory of file structure, where K – signifies service stopped, S -signifies service started.
Now let’s look at the processes
init is the mother of all processes, PID refers to process ID(A unique identifier for the process). PID of init process is 1. There are four different states for a process, at any point of time a process can be in any of these four states, these are namely Running(R), Waiting(S, D), Stopped(T), Zombie(Z).
In Running state process has the resources and being executed, in Waiting state process may not have complete resources to get executed and is been waiting for some or all of the resources. When we halt a process it can enter Stopped state or Zombie state, A process gets stopped after it’s execution or we can stop it forcefully, it may enter Zombie state if it still locked on to some resources , these are difficult to identify. Now let’s discuss about processes in detail.
All processes except the root have PPID, referred to as Parent Process ID, processes will have their priority order of execution.
& is used to start a process.
ps is used to see process status.
ps -e gives us the list of executing processes.
ps -ef used to get more info on processes.
ps -u username list out all the processes of user.
ps -u username -N lists all processes except user processes.
Zombie processes can’t be identified with ps, we use top command to see all the processes, Zombie processes inclusive.
top -b displays the processes in batch mode.
top –<number_of_refreshes> displays the processes with number of refreshes as mention.
ex: top -4 will refresh 4 times.
when you see the process status, you see re-nice values, which signifies the priority order of execution.
when you run top command, it will direct to a new prompt, where you can enter
d for delay
z to highlight zombie processes.
top -u lists out all the processes for a particular user
Now let’s discuss about grep command
grep command is used to search patterns in one or more than one files.
grep -i <pattern> filename used to search pattern by ignoring case sensitivity.
grep -linenumber pattern filename used to search pattern in every nth line with n = given line number.
There are few operators, widely used
pipe(|) operator :
| is used to pass output of one command as the input to another command. Frankly speaking, I have never used this operator since my Linux training, I am happy that now I have used every character on keyboard.
ex: ls | grep rc* will pass the output of ls i.e. the files and the directories under current directory to grep command and grep will search all file/ directories whose name start with “rc”.
Greater than (>) operator :
This operator acts as Standard output stream, used to stdout from a file to screen or used to redirect stdout to other file. Used along with cat command to open a file in write mode.
Less than(<) operator:
this operator acts as Standard input stream, used to stdin to a file or used to redirect stdin from another file.
Double Greater (>>) operator:
this operator is used along with cat command to open a file in append mode.
awk :
Awk stands for the names of its authors “Aho, Weinberger, and Kernighan”.
awk behaves like a programming language, it has variable declarations, control flow, loops, functions etc.,
We generally use awk for creating formatted reports, also used for pattern scanning and processing.
Features of awk:
It views a text file as records and fields.
It has string and arithmetic operators.
awk is much powerful than sed (stream line editor)
syntax of awk:
awk pattern action filename/ standard input
example:
awk ‘{print}’ employee.txt
will print the content of employee.txt file
awk ‘{print $1}’ employee.txt
will print the first column of employee.txt with space as default delimiter in the file.
usage:
text files with space separated columns are treated as tables, we pass various arguments to the command each have it’s own significance.
the following are passed along with the action
FS signifies Field Separator, default is space, we can pass any character as Field(column) separator.
RS signifies Record Separator, default is ‘\n’ we can pass any character as Record(row) separator.
OFS signifies Output Field Separator.
ORS signifies Output Record Seperator.
in syntax we use action_name FS RS OFS ORS
ex:
‘{print $1}’ implies first column as Output Field separator.
‘{print $NF}’ implies last column as Output Field Separator.
also
awk -F is used for filed separator, takes space by default.
awk -f is used for script files, i.e we can write it to any file.
Generating formatted reports using awk:
we use BEGIN, END in the syntax for the block.
Searching patterns using awk:
syntax: awk ‘/praveen/’ employee.txt
I have just given an overview of awk, to see its examples, do refer this Linux/unix awk examples
Let’s look at user administration
User Administration is one of the key concepts of Linux,
to create an user we use useradd
to modify an user we use usermod
to delete the user we use userdel
Let’s look at examples
adding used named vivek to group named rsftp
useradd -G rsftp -d/date/home/vivek -m vivek
passwd vivek
Let’s look at few more examples
There will be primary and secondary groups in Linux, to add a user to secondary group,
usermod -G sales vivek
To add user tom to sales but also keep his existing membership of ftp users,
usermod -G ftpusers, sales tom
Add existing user to a primary group
usermod -g sales jerry
Let’s have an overview of Sed(Stream Line Editor)
Sed or Stream Editor is very powerful tool, used mainly for text substitution , find & replace but it can also perform other text manipulations like insertion, deletion, search etc. With Sed, we can edit complete files without actually having to open it.
sed options:
usage: sed ‘preoption/searchstring/postoption’ filename
pre command options:
s for substituting does replacing
i for insert, i makes the changes permanent
post command options:
p for printing
c for modifying the complete line
a for append
d for delete
w to write to a file
n for a number like 1, 2 etc., while n itself checks for all occurrences
e for multiple sed commands , we use ‘ ‘(space) to separate the commands.
SED Examples:
sed ‘s/he/praveen’ file.txt
will replace all occurrences of ‘he’ with ‘praveen’
To see more examples with above options, do refer geeksforgeeks examples on sed.
Let’s look the Shell Script, it is the Linux’s default script, used widely for automation.
there are different editors we can use for writing shell script, few of them are nano editor, bash etc ,.
let’s dive deep into shell script,
to open a shell file, use either
nano filename.sh
or
bash filename.sh
vi command does the same but I recommend nano. to run a shell file we use ./filename.sh, only admin can run the file by default if you want to give access to all users, change file permission either using chmod
chmod 777 filename.sh
will make the file read/write/executable by everyone.
now after opening nano editor, you can write all commands that you write in terminal but these only be executed when we run this file, apart this commands, we have various programming features like variable declarations, standard output, standard input, control flow, loops etc,. as I of my experience with shell script, syntax and semantics are strict even a space has some significance unlike c,java, python the semantics are very strict.
Declarations and Initialization s :
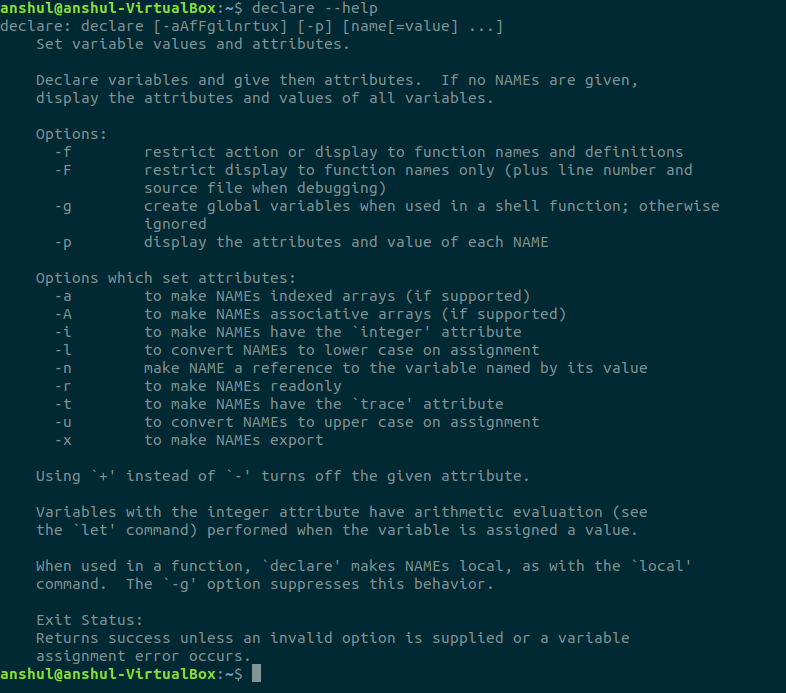
declare statement is used for declaring variables, it is used for creating read only variables.
usage:
declare -r var
will declare read only variable, refer the following picture for more option
now we will initialize the variable
var=30
observe there are no spaces before and after ‘=’. shell script strictly follows semantics. we don’t need to use declare statement to create a variable, script will create variable upon it’s first assignment of value just like above var.
Standard Output:
echo statement is used to standard output to the screen
echo $var
gives 30, observe that while accessing variables, we must use $ as precede to variable name. echo by default appends a ‘\n’ (end of line) character.
printf does the same operation as echo but printf is generally used to print formatted outputs, unlike echo, printf doesn’t append ‘\n’ character, to print above variable value we use
printf ‘%d’ “$var”
will print 30, however using printf will prevent from exceptions. It is always better to use printf rather echo.
Standard Input:
read input_var
will read the input and will store that in input_var. we can read into multiple variables, the following way
read ip1 ip2 ip3
Datatypes:
| Data type | Prefix | Example |
| Boolean | bln | blnFound |
| Byte | byt | bytRasterData |
| Date (Time) | dtm | dtmStart |
| Double | dbl | dblTolerance |
| Integer | int | intQuantity |
| Long | lng | lngDistance |
| Object | obj | objCurrent |
| String | str | strFName |
Shell script is dynamically typed, so to identify a variable it’s recommended to use prefixes before varible name, like above bln signifies boolean variable, byt signifies byte, str signifies string etc,.
expr commend significance:
expr command is used to evaluate an expression and print the output to screen
usage: expr expression
example: expr 2 +3 will give 5
for storing the output of expr into another variable, we use back ticks(“)
ex: sum=`expr 10/2` will store 5 in sum
expr evaluates arithmetic operators, it will only work with integers, for float we use bc command.
Now for control flow, loops and function I will go with pictures and will just let you know about syntax.
Control flow:
if:
if [ expression ]
then
   statement
fi
if -else:
if [ expression ]
then
   statement1
else
   statement2
fi
else-if ladder:
if [ expression1 ]
then
   statement1
   statement2
   .
   .
elif [ expression2 ]
then
   statement3
   statement4
   .
   .
else
   statement5
fi
nested if:
if [ expression1 ]
then
   statement1
   statement2
   .
else
   if [ expression2 ]
   then
      statement3
      .
   fi
fi
switch:
case  in
   Pattern 1) Statement 1;;
   Pattern n) Statement n;;
esac
In all the above cases expressions are used for conditional checking.
Loops:
for loop:
for var in word1 word2 ...wordn
do
   Statement to be executed
done
for loop(java/c style):
for (( EXP1; EXP2; EXP3 ))
do
   Statements to be executed
done
while loop:
while [ expression ]
do
   Statement to be executed
done
until loop:
until [ expression ]
do
   Statement to be executed until command is true
done
unlike for and while loops, until loop terminates if the command is true. In all the above cases do and done are keywords and used as those are.
Arrays:
arrays can be declared like
arr[n]=(value1, value2,….value_n-1)
or
we can declare explicitly using declare keyword
declare -a arr
arr = (val1,val2,….val_n)
Functions:
just like in python where we use def keyword to define a function, here we use function keyword.
syntax:
function name { COMMANDS ; }
observe that when there are no arguments to the function, we don’t have to use parenthesis, also we don’t need to use function keyword when we are using parenthesis
syntax:
name () { COMMANDS ; }
By now we have a good knowledge on Linux, One last topic to discuss is about creating backups, Creating file backups is easy, based on the size of the file we use different compression tools for backup formats.
We generally use zip
usage: zip backupfilename.zip filename.format
tar is used for large files
usage: tar backupfile.tar filename.format
there are two different zipping strategies bzip2, gzip, these two are powerful than zip
usage: bzip2 filename
this will not keep the original to keep the original file as it is and create a backup for the same, we use
bzip2 -zk filename
Gzip stands for Gun zip
usage: gzip filename
to preserve the original file while backup use
gzip -k filename
With this blog, I have shared my 90 % of knowledge on Linux that I have got from training, I really appreciate if you have read every word without skipping, hope you have enjoyed the blog, thank you reader.